Listen up, I am here to show you how to do an animation,
which can also be used to create a slideshow
Our last post we had two animations and were asked by a fellow reader how it was done. Though it is rather simple, it does take a little planning, especially if one decides to add text. Overall the process requires a little forethought as to what one wishes to achieve.
Now I use Photoshop, which has an animation feature. Adobe’s Elements 10, available for Macintosh and Windows, has a feature for turning pictures into movies, which is not the same as creating a regular animation. I did search Adobe’s Element 10 website for an answer if they have an animation feature, but was unable to discover any mention of it.
I mentioned that you can also create a slideshow of your images and not just an animation, between the two there is little difference, so what I am sharing with you today, applies to both.
In order to achieve a good sequence of multiple images it is important to have the camera on a tripod and the subject matter moving slowly so that you are able to capture a good number of images that are equally spaced out, so not to appear choppy. Now if you are working with only two or three images already available, just make sure that they work in the sequence your planning to put together.
Copy all your images into a folder and I suggest adding a prefix of #01, #02 etc., to each image so you know which one to import first into Photoshop. As you begin to open an image decide what size the animation is going to be, then resize the image and save it for ‘Web and other Devises’. This way you will optimize each image and reduce file size. Do this to all the images you are planning to use.
Concerning the final size of the animation/slideshow, I recommend no larger that 400 pixels and no smaller than 150 pixels for best results within Blogger. I should also point out that once it is uploaded to Blogger, it has to be at ‘Original Size’ or it will not run, but let’s get back to importing the images to Photoshop.
Now that they are all resized, create a new file based on their final size and begin importing them with the first image first and so forth. You will notice that you have created a set of layers, one upon another. Now safe it.
Building upon the first image and layer
All images are imported and in their own layer
Make sure all layers are deselected except for the first image
Select and obtain the animation window from the menu bar
Import the first image. Note you are in frame mode, which is preferred
After having imported all your images it is time to select
the exposure of each image
Select the desired exposure rate
With all still selected set to ‘forever’ otherwise the animation will only run once
Now save for the internet
Make sure to check GIF to it will not work
Time to check how it looks and if it needs any adjustments -
remember it needs to be 'Original Size'
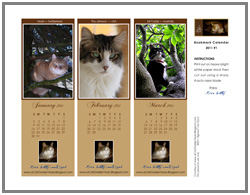
If you are doing a slide show, the only thing you will do is adjust the length each frame is exposed in order to allow one to view the image before proceeding to the next one. Should your slide show contain vertical and horizontal images there are two other steps that needs to be accomplished before importing all your images.
When one combines vertical and horizontal, your end format will be a square and the background will be white unless you decide to go transparent. For a sample of a combination of vertical and horizontal images in a square layout please visit my
Art of Aids post.
Now it is time for an afternoon snooze before dinner
(^..^)
♥